Follow these steps in order to install the Botting Hub AI client, set up 2FA, configure your settings and start botting. The core install takes about 10 minutes.
A license key is sent to your email to access your product. Orders typically process within 5–15 minutes. If you haven't received it, you may have entered your email incorrectly at checkout.
Key not arriving after 15 minutes? Join our Discord and the team will sort it out fast.
All four files are mandatory. Use the exact locations shown — Sandboxie in Program Files; Proxifier and the Jagex Launcher in Program Files (x86) — or the client won't run correctly.
The BH Client is compatible exclusively with Jagex accounts — legacy accounts are no longer supported by Jagex.
It can seamlessly handle 2FA verification by accessing your email inbox. To enable this, configure app passwords as described in the 2FA setup. The "email password" you enter in the client must be the app-specific password generated by Gmail — not your normal Gmail password.
Multiple accounts — the +Gmail method
It's recommended to use one character per account. If you're botting multiple Jagex accounts (or converting legacy accounts to Jagex), use the +Gmail trick — every address with a +suffix is delivered to your primary inbox:
This makes 2FA automation work for both the client and the account creator. If you'd rather not automate it, just enter a random email and password and type the verification code manually — but never leave the email or password fields blank.
Requirements
64-bit Windows operating system
Google Chrome browser installed
One single brand-new Gmail address with 2-Factor Authentication enabled
Generate the Gmail app password
Enable Two-Factor Authentication on your Gmail account.
Go to your Gmail settings and open App passwords — you can find it by typing "App passwords" into the Search Google Account bar at the top of the page.
Under App Passwords, enter Bot Manager as the app name and click Create.
A generated app password will appear. Copy it, then paste it into the BH Client under "Gmail password" — and be sure to also enter your Gmail address.
Gmail → App passwords. Name it "Bot Manager", create, then paste the generated password into the client.
Speeds up graphics processing and resolves client flickering, delivering smoother performance for both solo users and large-scale account farms.
Hardware Input ModeExperimental
Routes all bot actions through your actual hardware mouse. This advanced anti-detection feature ensures every in-game input is generated by physical hardware rather than software, making it virtually impossible for Jagex to tell bot input from human input. Ideal for account farmers aiming to minimize ban risk and reliably run multiple clients like a real player.
Skip Settings Check
Bypasses the initial configuration routine at startup for fast deployment with standardized setups. If you enable this, you must not change any settings, camera angle or other configuration done initially.
Conversational AIPaid
Enables the bot to participate in game chat using AI-driven responses, enhancing realism and social blending while supporting advanced automation and content creation.
This is the step people get wrong most often — read it carefully. The bot reads the screen, so anything that covers part of the game or changes its scale will break it.
Always launch the official client from scratch using the Botting Hub Launcher. It opens the client in fixed mode at the exact size the AI was trained on.
Set the OSRS client to Fixed mode — Classic layout.
The popup bar must be disabled in the OSRS client. No popup or notification bar should be visible over the game — it covers part of the screen the bot is reading, and anything it hides is simply not there as far as the AI is concerned.
This is the popup bar setting: Settings → Popout → Popout panel (desktop). Untick the box the arrow points at so it is off.
Disable minimap zoom. The bot reads the minimap at the scale it was trained on, so a zoomed minimap makes walking and object detection unreliable — usually as a script that wanders or stalls rather than one that stops with an error.
Leave the game zoom at the default. The models were trained at the client’s default zoom level, so scrolling the camera in or out rescales everything the bot is looking for. If you have zoomed at any point, put it back before you start — the symptom is missed or misidentified objects rather than a script that stops with a clear error.
Do not launch OSRS manually in random sizes or layouts — it will make the bot malfunction. And never minimize the game client while a script is running.
If you have Skip Settings Check enabled, the client will not fix any of this for you at startup — check the popup bar, the game zoom and the minimap zoom yourself before your first run, and leave them alone afterwards.
Each script expects a specific starting state. Find your skill below and match the requirements before you start.
NMZ
Rock cake + NMZ unlocked (Vampire Slayer, Tourist Trap, Fishing Contest, The Grand Tree, Tree Gnome Village, Mountain Daughter). Enough coins in the coffer and supplies in the bank, and an initial dream made. Start the script at the NMZ area. Keep supplies in your main bank tab — do not spread them across other tabs.
Absorption potions — requires over 200k points / a rock cake. · Prayer potions — requires 150+ prayer potions; use this setup until you have enough points.
MLM
30 Mining, a pickaxe in your inventory. Start at the MLM bank.
AGILITY
Start near the selected course with food in your inventory (shrimp, salmon, trout, tuna, monkfish, jug of wine, cake, chocolate cake and slices).
SAND CRABS
Start near the Sand Crab Isle bank. Keep supplies in your main bank tab — do not spread them across other tabs.
GEMSTONE CRAB
Start the script in any of the caves — it finds the crab wherever it has moved to. Bring your supplies with you: food, combat potions and a special attack weapon. Requires Children of the Sun for Varlamore access. The script fights and re-finds the crab; it does not mine the shell.
MINER
Start near the selected mining location with a pickaxe in your inventory. If mining in a dangerous area, make sure your attack style is set to hidden.
MAGIC
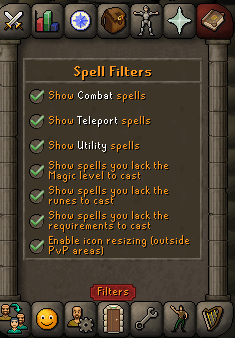
Have the runes for your chosen spell in your inventory, and set your spell filters before starting.
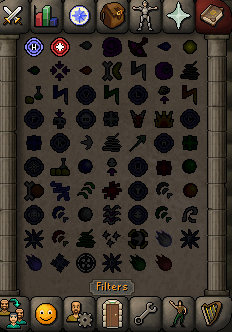
Spell filters must all be enabled. Open the spellbook, click Filters at the bottom, and turn every option on — Combat, Teleport and Utility spells, plus the three “show spells you lack…” options and icon resizing. The bot clicks spells by their position in the grid, so any filter that hides a spell shifts every icon after it and the bot ends up clicking the wrong one.
Click Filters at the bottom of the spellbook and tick all of these.With the filters set, your spellbook should look like this — the full grid, nothing hidden.
COOKING
P2P: start at Rogues' Den with raw fish in the bank. F2P: start at the Draynor bank. Keep the raw fish at the top of your bank and do not use placeholders.
FLETCHING
Start at the selected bank. Keep enough supplies at the top of your bank and do not use placeholders.
CRAFTING
Start at the selected location. Keep enough supplies at the top of your bank and do not use placeholders.
HERBLORE
Start at the selected location. Keep enough supplies at the top of your bank and do not use placeholders. Druidic Ritual quest required.
SMITHING
Start at the selected location. Keep enough supplies at the top of your bank and do not use placeholders.
FIREMAKING
Start at the selected location. Keep enough logs at the top of your bank and do not use placeholders.
FISHING
Start near the selected fishing location with fishing supplies in your inventory (fishing rod, feather, etc.).
HUNTER
Start at the selected hunting spot with enough supplies in your inventory (20 box traps, bird snare, etc.). Supported locations: Piscatoris / Feldip Hills. Eagle's Peak quest is required to lay box traps.
Powerchop mode: continuously chops your selected tree near your character and drops the logs for max efficiency — just move to your chopping area before starting. Banking mode: chops your selected tree and banks the logs at the nearest accessible bank.
BLAST FURNACE
Have enough coins, ores, stamina potions, a coal bag and ice gloves in your bank. Place all required supplies at the top of your bank and avoid placeholders. Start on a Blast Furnace world while standing inside the Blast Furnace area.
BLOOD RUNECRAFTER
Start near the dense runestone with a pickaxe and a chisel. Requires 73 Agility, 77 Runecrafting, 38 Mining & Crafting.
RUNECRAFTING
Start at Falador bank for the Air rune method, or at the Castle Wars bank for the Fire and Lava rune methods. Keep everything the run needs at the top of your bank where it is visible, and do not use placeholders — the bot reads the bank off the screen, so anything it has to scroll to find is anything it cannot find.
Start with the ring and amulet slots empty. The bot works out what it is wearing by reading those two slots, so anything in them that the method does not call for — a stray ring, a glory, a skills necklace — gets misread and the run goes wrong. Air uses no jewellery at all, so leave both bare. For Fire and Lava, wear only what is listed below and nothing else.
Air runes (level 1+): start at Falador bank with the Air tiara worn and pure or rune essence in the bank. The bank and the altar are one local walk, so no teleports and no jewellery are involved.
Fire runes (level 14+): start at Castle Wars bank with the Fire tiara and a Ring of duelingboth worn. In the bank, visible at the top: pure or rune essence, stamina potions, and spare Ring of dueling(8). The bot reads the charges off the worn ring and swaps in a fresh one before it crumbles.
Lava runes (level 23+): everything Fire needs, plus three more things — a Binding necklace worn (keep spares at the top of the bank, it crumbles and the bot replaces it), Earth runes, and an Earth talisman. The runes and the talisman are not the same requirement: the runes sit in the inventory, and the talisman is used on the Fire altar. Pure essence is mandatory here — rune essence cannot make combination runes, so the bot forces pure essence whatever the dropdown says.
Progression mode starts on the method you picked and switches to Fire and then Lava at the levels you set (defaults 14 and 23). It wears the right tiara and banks the old one itself, so keep both tiaras available. Note that Lava is crafted at the Fire altar — there is no Lava tiara, and the Fire tiara covers both.
CHAOS DRUIDS
Keep a looting bag in your bank, along with food and glory charges, and wear the gear you want to use before starting. Make sure player attack is hidden.
The bot loots by reading the labels the Ground Items overlay draws. It picks up what it can see written on the floor and nothing else, so the overlay settings are not cosmetic here — they are what the script is looking at. Leave the tier colours on white (the default).
Keep the threshold at 0 gp. A threshold of 0 is what makes untradeable items appear on the overlay, and the looting bag is untradeable — at anything higher the bot never sees the bag and cannot pick it up. Leave it at 0 permanently rather than raising it once you have one.
Ground Items overlay — tier colours on white with the Tier 1 price at 0, so untradeables like the looting bag are labelled and can be looted.
Then hide the junk with Ctrl. Because the threshold is at 0, everything on the floor gets a label — including plenty you do not want. Hold Ctrl and click an item’s label to send it to the hidden items list: bones, cheap runes and any other low-value drop. Whatever you leave visible is what the bot picks up, and an inventory full of junk means it banks early and earns less.
The hidden items list — cheap drops blacklisted with Ctrl + click, so they never reach the overlay for the bot to see.
PRAYER
Have noted bones and coins in your inventory. Start in Rimmington, near the house portal, on world 330.
AIR ORBER
Keep your supplies at the top of your bank along with glory amulets. Wear the staff of air before starting. Requires 66 Magic — high Defence and HP recommended.
Spell filters must all be enabled, exactly as for the Magic script above. Open the spellbook, click Filters, and turn every option on so the full grid is visible — a hidden spell shifts the icons and the bot clicks the wrong one.
Click Filters at the bottom of the spellbook and tick all of these.With the filters set, your spellbook should look like this — the full grid, nothing hidden.
FIRE ORBER
Start at Falador bank with cosmic runes, antipoison, food and unpowered orbs at the top of your bank. Wear the staff of fire before starting. Uses the Taverley dungeon agility shortcut — requires 75 Agility and a summer pie.
Spell filters must all be enabled, exactly as for the Magic script. Open the spellbook, click Filters, and turn every option on so the full grid is visible — a hidden spell shifts the icons and the bot clicks the wrong one.
Every filter on, so the spellbook renders its full, unshifted grid.
CANNONBALLER
Start at the ogres with a cannon and cannonballs in your inventory. If High Alchemy is enabled, also bring your high alch items and a fire staff.
GUARDIANS OF THE RIFT
Make sure the two quests required for Guardians of the Rift are completed, then start in the Guardians of the Rift area.
61+ Mining recommended. 61 is where the dragon pickaxe becomes usable, and it mines guardian fragments fast enough to change the shape of a game — more fragments per round means more points, and fewer rounds spent short on essence.
50+ Runecrafting recommended. Below 50 you craft too little per game for the points to be worth the run. 50 is also where the large pouch becomes usable, and carrying more essence per trip is the single biggest lift to points per game — the bigger pouches follow as you level past it.
F2P FIGHTER
Keep a brass key, food and armor at the top of your bank.
Cow mode: start at the cows north of Lumbridge. It banks at Draynor, so keep your supplies there.
Hill giants mode: start at Varrock west bank, which is also where it banks.
Progressive mode: the bot moves from cows to hill giants at the level you set in the GUI — so it switches from the Draynor bank to Varrock west at the same time. Have your supplies in both banks before you start, or it will arrive at Varrock west with nothing to withdraw.
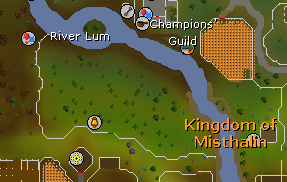
Cow mode location — the cow pen just north of Lumbridge.
BLUE DRAGONS
Start at Falador bank with potions, food and Falador teleport tabs at the top of your bank. Requires 65 Agility and a summer pie for the dungeon shortcut.
Anti-dragonfire is mandatory. The anti-dragon shield comes from Duke Horacio in Lumbridge Castle once you have started Dragon Slayer I, which needs 32 Quest Points to begin. The quest only needs to be started, not finished.
The bot loots by reading the labels the Ground Items overlay draws. It picks up what it can see written on the floor and nothing else, so the overlay settings are not cosmetic here — they are what the script is looking at. Leave the tier colours on white (the default).
Keep the threshold at 0 gp. A threshold of 0 is what makes untradeable items appear on the overlay, and the looting bag is untradeable — at anything higher the bot never sees the bag and cannot pick it up. Leave it at 0 permanently rather than raising it once you have one.
Ground Items overlay — tier colours on white with the Tier 1 price at 0, so untradeables like the looting bag are labelled and can be looted.
Then hide the junk with Ctrl. Because the threshold is at 0, everything on the floor gets a label — including plenty you do not want. Hold Ctrl and click an item’s label to send it to the hidden items list: cheap runes and low-tier gear drops like steel and mithril. Leave dragon bones and blue dragonhide visible — those are the whole trip. Whatever you leave visible is what the bot picks up, and an inventory full of junk means it banks early and earns less.
The hidden items list — cheap drops blacklisted with Ctrl + click, so they never reach the overlay for the bot to see.
GREEN DRAGONS
Wilderness script — other players can and will attack you, so send it out in gear you can afford to lose. Keep your gear set, food, potions and a looting bag at the top of your bank and do not use placeholders. High combat stats are strongly recommended. Wear a charged amulet of glory for the Edgeville bank route, or a ring of dueling for the Ferox Enclave route, and keep a burning amulet for the trip out to Bandit Camp.
Anti-dragonfire is mandatory — green dragon breath hits for around 50 unprotected. The anti-dragon shield comes from Duke Horacio in Lumbridge Castle once you have started Dragon Slayer I, which needs 32 Quest Points to begin. The quest only needs to be started, not finished. A Dragonfire shield works as well if you have 75 Defence.
The bot loots by reading the labels the Ground Items overlay draws. It picks up what it can see written on the floor and nothing else, so the overlay settings are not cosmetic here — they are what the script is looking at. Leave the tier colours on white (the default).
Keep the threshold at 0 gp. A threshold of 0 is what makes untradeable items appear on the overlay, and the looting bag is untradeable — at anything higher the bot never sees the bag and cannot pick it up. Leave it at 0 permanently rather than raising it once you have one.
Ground Items overlay — tier colours on white with the Tier 1 price at 0, so untradeables like the looting bag are highlighted and can be looted.
Then hide the junk with Ctrl. Because the threshold is at 0, everything on the floor gets a label — including plenty you do not want. Hold Ctrl and click an item’s label to send it to the hidden items list: cheap runes and low-tier gear drops like steel and mithril. Leave dragon bones and green dragonhide visible — those are the whole trip. Whatever you leave visible is what the bot picks up, and an inventory full of junk means it banks early and earns less.
The hidden items list — cheap drops blacklisted with Ctrl + click, so they never reach the overlay for the bot to see.
UNDEAD PIRATES
Keep food, potions and a charged amulet of glory with you — it banks at Edgeville with the glory teleport. Keep your supplies at the top of your bank and do not use placeholders.
Blacklist the junk in your Ground Items settings. Add bones and any other low-value drops to the hidden items list so they never appear on the overlay. The bot loots what the overlay shows it, so anything you leave visible is something it will pick up — and an inventory full of bones means it banks early and earns less.
Ground Items overlay — tier colours on white, with the junk you do not want hidden via the blacklist.
WARRIORS GUILD
Start inside the Warriors’ Guild with food and potions. Entry needs 130 combined Attack and Strength — for example 65 Attack and 65 Strength. Bring a full adamant, mithril or black armour set for the animated armour room; those are the three the script supports.
The bot loots by reading the labels the Ground Items overlay draws. It picks up what it can see written on the floor and nothing else, so the overlay settings are not cosmetic here — they are what the script is looking at. Keep the tier colours on white and the Tier 1 price at 0.
The threshold has to stay at 0 gp. A threshold of 0 is what makes untradeable items appear on the overlay, and the defender is untradeable. Raise it above 0 and the defender is never labelled — so the bot cannot see it and walks straight past the drop you were farming for.
Ground Items overlay — tier colours on white with the Tier 1 price at 0, so untradeables like the defender are labelled and can be looted.
Then hide the junk with Ctrl. Because the threshold is at 0, everything on the floor gets a label — including plenty you do not want. Hold Ctrl and click an item’s label to send it to the hidden items list: big bones, cheap steel drops and anything else not worth the trip. Whatever you leave visible is what the bot picks up, and an inventory full of bones means it banks early and earns less.
The hidden items list — junk like big bones and cheap steel drops blacklisted with Ctrl + click, so they never reach the overlay for the bot to see.
TITHE FARM
Start in front of your house — you need a house with a garden, which is where the bagged plants go. It goes in through the portal itself. Keep noted bagged plant 1, coins and your watering cans with you.
Under 34 Farming? It trains it for you. The script plants bagged plants in the garden and clears the spots on a loop until Farming reaches 34, then leaves the house and heads to Hosidius. Start it above 34 and it goes straight to the minigame.
All three seeds are supported.Golovanova from 34, Bologano from 54 and Logavano from 74. It plants the best tier your level allows and moves up on its own as you unlock them — there is nothing to switch over.
Bring at least 8 watering cans. A can runs dry well before a round is over, and with fewer than eight the bot spends more of the run walking back to refill than it does farming — eight is the practical floor for a full-speed run. The gricoller’s can is a Tithe Farm reward and never needs refilling at all, so buy it as soon as your points allow and the problem goes away for good.
High Agility and a Graceful outfit are strongly recommended. Tithe Farm is a lot of running up and down the rows, and run energy is what keeps the bot on the timer. A higher Agility level restores energy faster, and Graceful cuts your weight and speeds that recovery up further — together they keep it running instead of walking, which means fewer dead plants and more points per round.
A slow PC or slow internet can kill plants — that is not the script. Tithe Farm runs on a tight watering timer, so lag from a struggling computer or a slow or unstable connection can delay a watering just long enough for a plant to die. The bot is acting on time; the game is simply receiving it late. If you are losing plants regularly, check your PC and your connection before anything else.
Having a problem? Click the one that matches — most issues come down to one of the settings below.
The bot clicks the wrong things or doesn't react
99% of the time it's one of these four. Check each one:
• Display scaling is 100% (Windows & display).
• Windows language is English (keyboard, apps, display, regional).
• The game is in Fixed mode — Classic layout.
• You opened the game with the BH Launcher, not manually.
The bot froze or stopped mid-run
Never minimize the game client while a script is running — the AI can't see a minimized window. Keep it open and on screen. If you turned on Skip Settings Check, make sure you didn't change any settings or the camera after setup.
The 2FA code isn't filling in automatically
In the client, the "Gmail password" must be the app password you generated — not your normal Gmail password — and you must also fill in your Gmail address. You also need Google Chrome installed and 2-Factor Authentication enabled on that Gmail. Full steps: 2FA setup.
The client won't open / antivirus blocks it
Add the Botting Hub folder to your antivirus exclusions and turn off real-time protection — follow Antivirus exclusions step by step.
I didn't get my license key
Orders take 5–15 minutes. Check your spam folder and make sure you typed your email correctly at checkout. Still nothing? Ask in Discord.
Still stuck?
Our team and community are active in Discord — most setup questions are answered in minutes.